In September 2008, Sony loaned MAA its latest standard definition hard drive and DVD recorder model, the RDR-HXD890. This model was tested for its captioning capabilities and ease of use. Please note that this hard drive contains an analog input and in 2013, when the switch-over to digital signal is completed, this function will no longer be useful.
Ease of set-up
The connection of cables directly to the television is no problem. If you wish to watch both analog and digital signals, be sure to follow the diagram in the manual carefully. An extra aerial cable must be bought as it is not supplied. Therefore, to watch both analog and digital through the device, two aerial and one set of component cables are needed.
An important step is to set up the remote control of the hard drive to control the television. This is important for future functions. There is no real difficulty in setting up the hard drive.
The manual
The manual, although very useful, is a little confusing. There is an index to search for keywords; however the reviewer believes the manual to be a little more complicated than necessary. Once the setup is finished and basic functions learned, this is not an important factor.
Ease of accessing captions
Captions are easily accessed when watching in digital mode by pressing one button. The captions are displayed on black background and use a large, well spaced font.
Recording captions to the hard drive
To record the captions onto the hard drive, all that is needed is to select the channel that you want to watch, turn on the captions by pressing the ’subtitles’ button (if captions are available) and select the HDD option at the top of the remote. To begin recording, press the ‘rec’ button and the captions will be recorded together with the show. It is not possible to turn off captions at this stage (for the program you are recording). To finish recording press the ‘rec stop’ button.
There is also the option to set a timer for recording. Once the desired program is recorded, it is not possible to turn captions on and off during playback, they are permanently displayed.
Recording captions to DVD
To record the captions onto the DVD, all that is needed is to select the channel that you want to watch, turn on the captions by pressing the ‘subtitles’ button (if captions are available) and select the DVD option on the top of the remote. To begin recording, press the ‘rec’ button after inserting a DVD into the DVD drive and the captions will be recorded together with the show. It is not possible to turn off captions at this stage (for the program you are recording). To finish recording press the “rec stop” button.
There is also the option to set a timer for recording. This can be done for recording both on DVD and hard drive. Once the desired program is recorded, it is not possible to turn captions on and off during playback, they are permanently displayed.
Transfer of captions from the HD to the DVD
This process is done simply by pressing HDD/DVD dub. This will open a menu, allowing the user to record from the hard drive to the DVD. It will also record the captions that have been recorded on the hard drive to the DVD.
Can you watch one captioned show at the same time as recording another?
Yes you can. By being connected to the digital and analog signals you can transfer from one to the other whilst recording. The unit must be tuned into the two signals to change between the two channels.
To do so, and as a reminder both analog and digital signals need to be connected to the television and hard drive.
- Select the channel you wish to watch. Subsequently, you should press the ‘subtitles’ button on the remote to turn captions on.
- Select what medium (DVD or hard drive) you want to record the program on. Press 'rec' to start recording.
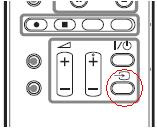
- Press the ‘input’ button (shown below) to switch between the digital signal and analog signal. This will allow the program to be recorded whilst you are watching another channel (on the analog output). Turn subtitles on this channel (if available) by pressing the appropriate button on your TV remote.

- Using your Sony hard drive remote (or your TV remote) you can switch between the two signals. Remember, nothing can be changed on the signal being recorded whilst it is being recorded.
Summary
Overall, the reviewer found this model to be a little difficult to learn. The caption font is relatively clear although slightly compressed compared to other brands. The recording of the captions is easy once you understand how to do it, but the remote control is considered confusing.
To view the Sony RDR-HXD890 and find out more please visit the Sony website.
Top of page

